What's happening in your garden today?

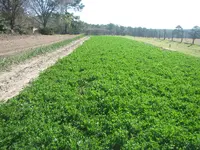
Well that looks awfully like what we call fleece, and we use that to insulate plants and keep them warm in the winter mostly.
If you have a glut of tomatoes, I would be very happy to use what you don't want. I dry and salt the cherry ones and make lots of sauces with the others 🤗
 
Well that looks awfully like what we call fleece, and we use that to insulate plants and keep them warm in the winter mostly.
If you have a glut of tomatoes, I would be very happy to use what you don't want. I dry and salt the cherry ones and make lots of sauces with the others 🤗
Dried and then salted? I should try that. I usually put excess cherry tomatoes in with the sauce tomatoes. Is an oven faster than a dehydrator for this recipe?
 
I much prefer to use a dehydrator. I cut cherry tomatoes in half, and add a little salt before drying- it can be easy to add too much!!!!! Dry them on about 55C and alternate the shelves regularly. Jar them up and watch carefully for about three days to check they are properly dry, add a sachet of silica gel to each jar. I wouldn't use my oven, it needs to be available all the time for other jobs, and I doubt it would be as efficient - don't know.
Of course the same principal can be used for larger tomatoes as well. We like to use them on pizzas, or on their own as a snack with cheese.
 
I much prefer to use a dehydrator. I cut cherry tomatoes in half, and add a little salt before drying...
So what would you tweak in this to make something like the glass jarred dried tomatoes packed in oil I buy? Simply dry them most to all the way and put them in a jar with (cheap) olive oil?

Short digging and some searching show mixed results.
University of Oregon mentions it in a preservation guide here
Purdue University doesn't mention it in their USDA guides. Drying or Tomatoes

guess I could just dry them then re-hydrate in oil for the day before wanting them
I would not 'tweak' this at all, and our personal taste is to leave them as they are - not dried to a cinder, but just a bit bendy as they should be. Zigs thinks they could start fermenting in a jar with oil which could explode the jar :eek:
If I felt mine needed olive oil (which is the only oil I ever use) then I would add a little when they go to the table, and not put any in the jar.
We don't find the need to re-hydrate these either, and use them as they are - full of flavour and just a bit chewy.
It's very important to 'condition' them after they come out of the dryer as I previously mentioned, to ensure they are done to perfection. Any sign of moisture, sticking to the glass etc. and they have to go back in the machine for a bit longer. Three days of inspection I find sufficient. :)
 
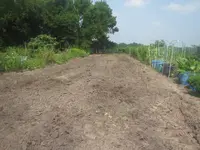
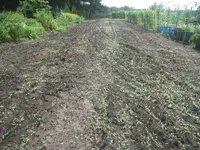
Today we're tilling up another row for tomatillos, sweet potatoes, a few zucchini, and cantaloupe.

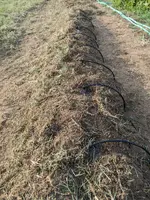
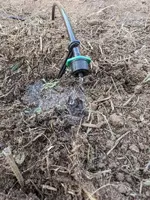
We'll also be experimenting with a drip irrigation system for this row too. If it goes good, we'll start to move the full garden to drip irrigation this fall. I'm hoping it'll work for us because right now I feel like we're wasting a lot of water on the parts of the garden where only weeds are growing. So, we have no idea what we're doing, or how we're gonna do it, but fingers crossed! 😂
 
With growing conditions approaching 100 and 100 (that's 100 deg f and 100% humidity) that will carry through to September and a portion of my garden soil needing replinishment, it is the perfect time for a summer cover crop.

First, I clear the area, then add several inches of well composted cow manure, and then lightly disc it in. That is where it stands now in this photo.

sunn hemp prep.JPG


Tomorrow I will hand seed it with Sunn Hemp, the most efficient summer cover crop I have found. In 12 weeks, after a couple of mowings, it will be over 10 ft tall and so dense a weed can not possibly grow...doubt it? Stayed tuned for a 12 week update.
 
Well, today we got the sweet potatoes, zucchini, cantaloupe, and tomatillos in the ground, under drip irrigation. I thought I'd share a few photos of the drip irrigation, after it was installed. We watered each spot for about 30 minutes to saturate the ground around where each plant would go, then moved the plants over to their forever homes. Please don't mind the weeds/grass all over the hills. The ground was very dry and a little tough to till up today. I should've watered the last few days but didn't think about it until the tiller was bouncing around like I was beating up concrete. I'll post another picture once we get things cleaned up and the plants are starting to grow (assuming they do). We already cleared all that up around the plants when we put them in, and will go back once they start to die and clear the rest, probably later this week or next weekend. We also plan on going back with some dirt to cover the main irrigation supply between each plant to help keep the sun from boiling the water that's left inside.

I really hope this works, and I don't see any reason why it won't, because my plan is to convert the entire rest of the garden to drip irrigation during this upcoming week. I'll be ordering everything I need, hopefully tomorrow. I'm not sure why I didn't think of this before. It's a lot more work, but a much better system than a ton of water hoses and sprinklers, as you can see is what I've used on the rest of the garden to the right.

Anyways, here are the pictures...

PXL_20240526_000330785.MP.jpg

PXL_20240526_000354955.MP.jpg
 
Of course I got home too late to post again last night so I'm posting a day late but I went to check on the garden yesterday and got 4 more yellow squash. There are quite a few pickling cucumbers that are awfully close to being ready. Also, yesterday, I got all the stuff ordered to convert the rest of the garden to drip irrigation so that will be this coming weekend's project.
 
With growing conditions approaching 100 and 100 (that's 100 deg f and 100% humidity) that will carry through to September and a portion of my garden soil needing replinishment, it is the perfect time for a summer cover crop.

First, I clear the area, then add several inches of well composted cow manure, and then lightly disc it in. That is where it stands now in this photo.

View attachment 254


Tomorrow I will hand seed it with Sunn Hemp, the most efficient summer cover crop I have found. In 12 weeks, after a couple of mowings, it will be over 10 ft tall and so dense a weed can not possibly grow...doubt it? Stayed tuned for a 12 week update.
We received a little shower today and the Sunn Hemp cover crop sprang to life...after only three days in the ground!! No kidding you can almost watch it grow.

sunn hemp 2 2024.JPG
 
We received a little shower today and the Sunn Hemp cover crop sprang to life...after only three days in the ground!! No kidding you can almost watch it grow.
So you said this stuff will get up to 10 foot tall? Then what do you do with it? Do you just chop it all down then plow it in? Also, do you have a tractor? I have to do all my work with a plain ol' lawn mower and a tiller, and I know darn well my mower isn't mowing down anything that's 10 foot tall. I was thinking of planting the alfalfa you'd mentioned before in the spot where I'm about to dig potatoes. After that, I'm not sure what I can plant when the squash and other veggies are done because it'll be too late in the year to plant alfalfa around here. It'll just be too darn hot and dry. I do want to do something to add nutrients back to the soil, though, because I'd really like to not have to rely on fertilizer year after year.
 
So you said this stuff will get up to 10 foot tall? Then what do you do with it? Do you just chop it all down then plow it in?
I'll usually mow it a couple of times and then let it grow to maturity. Chop and drop is the term widely used to describe this soil replenishment technique. At maturity, it tends to get a bit woody in the stalk.

Also, do you have a tractor? I have to do all my work with a plain ol' lawn mower and a tiller, and I know darn well my mower isn't mowing down anything that's 10 foot tall.
Yes, a Kubota compact tractor with about 23 hp. I run a 4ft flail mower behind it. A lawn mower would keep it manageable if you didn't let it get too far ahead of you.

... I was thinking of planting the alfalfa you'd mentioned before in the spot where I'm about to dig potatoes. After that, I'm not sure what I can plant when the squash and other veggies are done because it'll be too late in the year to plant alfalfa around here. It'll just be too darn hot and dry. I do want to do something to add nutrients back to the soil, though, because I'd really like to not have to rely on fertilizer year after year.
Here in East Texas I have found alfalfa to be most useful as a fall/winter/spring cover crop. I usually plant it in fall and disc it in spring. You might find it more suitable for summer for you....just have to find what works best for your climate.

There are many others that can add the nutrients you need. For example, one of the best is cow peas.

From a thread on another forum...I'll try to cut and paste rather than retype:


This thread demonstrates how I use cow peas in a chop and drop process in my garden to organically replenish the soil to the status of “No N-P-K” required without the use of synthetic fertilizers. In summer, the peas have a maturity cycle of just over 60 days making it possible to have multiple crops during a growing season.

The demonstration row, nicknamed @big rockpile, is 75 ft long and was planted in pink eye peas about April 1 this year. On June 3, it was shredded in the first round of chop and drop as shown below.


peas.JPG


The beauty of using cow peas for soil replenishment is that with just one handful of seeds, for well under $5, you can perform this chop and drop multiple times in the growing season without ever having to replant/reseed … if you leave sufficient numbers of mature peas to reseed each cycle. In the photo below, the peas from that initial shredding have germinated and are on their way to a second cycle of chop and drop. Note all the organic matter now in that row.


peas for big rock.JPG


The second cycle progressed into July, once again growing large amounts of great organic matter.


sunn hemp and peas.JPG


By the end of July, they had developed a good stand of matured peas suitable for picking and/or eating. This time, I elected to harvest a small basket full of peas to eat fresh because they are so delicious.


Bigrock gen 2 peas.JPG


As you can see in the photo below, there are still many peas left behind to reseed the third cycle.


gen 2 peas.JPG


You can use a lawn mower or whatever to “chop” or you can do this manually with a machete but that’s hard work in the Texas summer. With a mower, it takes less than 2 minutes to shred the entire 75 ft. row. This leaves a natural seed bed in which the peas left behind will germinate in a matter of days and begin the cycle all over again.


shredded 2nd gen.JPG


By early October, this third cycle of peas will be mature and can be harvested again and/or you can take a gamble on a fourth cycle which I have done in some years.

In a season with adequate rainfall (which this is not), this process will easily generate over 300 pounds of green organic matter each cycle totaling approximately 13 pounds of organic matter added per foot of row (assuming three cycles).

According to research performed at Texas A&M, the primary pathway for nitrogen transfer from a legume to the soil is through decomposition of dead legume plant material. The root system and unused leaves and stems of the legume decomposes via soil microbes over time. Nitrogen contained in this plant material is released and is available to other plants.

Significant green organic matter added to the soil and natural nitrogen made available for the next planting. …all for less than $5 worth of seed. Nothing I am aware of in gardening can even approach that kind of efficiency/cost ratio.


The third and final generation of cow peas(for this season), all grown from less than $5 worth of seed, needs to be turned under to free up some space for winter crops. They could continue to grow for another month+ and maybe even seed for a fourth generation of peas, but their space is needed for higher priority plants.

It's been a great run of chop and drop and soil building from these plants.

cow peas third generation.JPG
 
Love the idea of doing the peas, especially if they'll grow better in this summer heat. Gonna definitely have to weigh my options for the equipment I have but having a cover crop that produces food is even better.

Basically I'll probably want something that I can plant when the squash and tomatoes are done (everything else should be done by then too) then just keep it mowed through the fall and till next spring when it's time to plant next years veggies again.
 
Back
Top